If you’ve noticed some changes in the weather in the South recently, you’re not alone. The number of severe storms and tornados striking Nashville and the rest of Middle TN has dramatically increased, resulting in a surge in storm shelter construction. While practically speaking, a storm shelter is a great thing to have; these spaces are often only used for a few hours a year.
The story of this build begins when our client approached us with the desire to reclaim his shelter space as a proper home theater while taking full advantage of the acoustic isolation provided by the 12″ thick poured concrete walls.
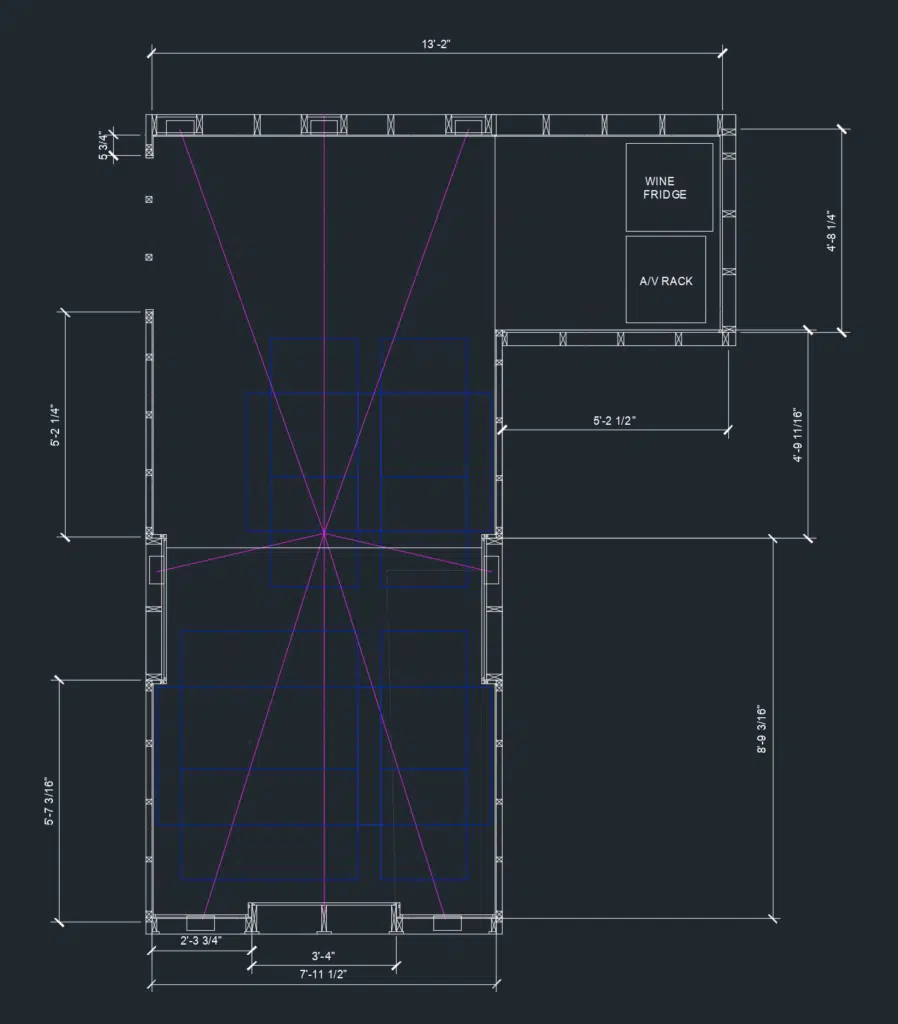
A very blank concrete canvas
Home Theater in a (Concrete) box
With a pre-build width of only 96″, space was at an absolute premium. A design requirement of having at least five fixed seats led us to create staggered wall depths in each section of the theater to help squeeze both the seating and speakers in.
CAD Layout of The Shelter Theater
This layout opened the door to employing varying types of acoustic treatments and bass trapping while at the same time creating some visual interest through the use of diffused LED accent lighting.
LED Lighting & Trim Details
The crown jewel of the build is a 104″ acoustically transparent projection screen by Screen Innovations. It’s paired with a light blasting HDR projector from LG that makes high-impact viewing possible, even with the lights on.
Screen Innovations Zero-Edge Pro Projection ScreenCustom Home Theater by Audilux
The room’s soundtrack is voiced by a full accouterment of seven 300 Series in-wall speakers from Focal. All of which are stealthily concealed behind the screen or in the walls around the room.
Illustration showing Left, Center, & Right speakers behind the screenThe Shelter Under ConstructionHidden Speakers & Acoustic Treatments
We wanted to find a way to provide illumination that would be fun but at the same time not distract too much from the theater’s prime directive. Several scenes were created including one inspired by “Stranger Things” (my personal favorite).
A “Stranger Things” inspired lighting themeProluxe LED Lighting & Extrusions
Our client chose a fully motorized option for home theater seating by Octane. Trimmed in top-grain leather and equipped with USB power outlets, underlighting, and plenty of storage, these home theater chairs make it easy to settle into a movie or binge your favorite show.
Lights can be controlled by the keypad on the wall or even turned on and off individually with the Elan remote control.
CEDIA Certified Electronic Systems Designer,
Principal Owner @ Audilux (Nashville, TN).
Former Audio Engineer, Record Producer, & Director with Page 2 Music
The process of working with a home technology integrator or AV company on your new home can seem daunting. So much so that even many builders avoid getting involved in the process altogether. While they have an entire army of subcontractors for pretty much anything else, when it comes to technology, you’re lucky to get a shortlist of contractor recommendations. Usually, you are sent off on a harrowing pilgrimage of discovery with nothing more than a prayer that you’ll find a trustworthy soul to enlighten you along the way.
Education is an essential part of our job. If you’ve never had the opportunity to build a custom home before, chances are you might not be aware of the technology that exists, and we try to at least inform you of all of the possibilities. While some things may not ultimately be in your budget, the worst thing that could happen is to find ourselves in a situation where we didn’t mention a product or solution, only for you to hear about it later when it’s too late to include it.
A few of the many hats of your home technology team
As integrators, we wear a lot of hats and can be involved in nearly every facet of the design of your home. If it’s not plumbing or basic electrical, there’s a chance you’ve entered a corner of our Pandora’s box. Whether it’s things that immediately come to mind like AV, home theater, and Wi-Fi, or more leading-edge systems like motorized shades, lighting control, and home automation, the possibilities are dizzyingly endless. Unfortunately, over time, we found there was so much scope to cover that most people didn’t completely understand what they were getting, let alone exactly where anything was going.
Back To The Drawing Board
When we first started the process of rethinking the template for our proposals, I was surprised to see there were no off-the-shelf options for making presentations to clients easy and understandable. So, with a background in graphic design, I decided to invest the time (which admittedly was an easier decision to make during the early days of the pandemic) and create an entirely custom set of icons and graphics that more effectively convey the design of our projects.
The main goal of this investment was to make sure people could easily see what was going where. This approach goes a long way towards ensuring clients understand what to expect when their home is complete and hopefully helps avoid some of those “I didn’t realize this is what you were talking about” moments.
While you don’t have to worry about how any of the magic works, I think it’s critical to provide a clear visual picture of where things are placed throughout the home. We got lots of feedback along the way from clients and family and have further streamlined the process as we’ve gone along. For example, each system is color-coded on the pricing proposal, matching our plans’ icon coloring. So if you see a blue security camera listed on the proposal, it makes it easy to look across and locate exactly where that piece is.
A Fresh Take On Technology Plans
Our new proposals feature easy-to-read icons
At this point, we’ve ended up with an entirely new process for presenting proposals that I feel provides plenty of easy-to-consume information. At the same time, it doesn’t require an electrical engineering degree or honorary Geek Squad nametag. When clients understand what they’re looking at, they can provide meaningful feedback and ask questions that help make us more effective members of your team. It’s been a worthwhile step and helps move us closer to our goal of delivering an experience that’s true “Magic by Design“.
CEDIA Certified Electronic Systems Designer,
Principal Owner @ Audilux (Nashville, TN).
Former Audio Engineer, Record Producer, & Director with Page 2 Music
Tip: If you’re brand new to the subject of lighting control systems, I’d suggest you start with this articleto get a basic idea of what’s available.
This post will discuss why you should consider custom lighting control for your home, how much it costs, and why we think Vantage is the best choice for lighting control.
First, let’s take a look at why you’d want to choose panelized lighting in the first place.
Table of Contents
Eliminating wall clutter
Traditional 4-Gang Lighting Bank
While it might sound a little silly at first, living in a large custom home presents quite a few challenges compared to the average 2400 sq ft American dwelling. We’ve all become accustomed to walking into a room, switching on the lights, and not giving it another thought, but things are considerably more complicated in a substantial estate.
As the design becomes more intricate, that single light switch turns into three or four switches and can quickly balloon into multiple banks of four or five switches each.
Suddenly you’re left trying to figure out what controls what, and your guests don’t have a prayer at operating things on their own.
Functionally, it’s incredibly confusing, and cosmetically you’re just expected to live with the “wall acne” that results.
In most homes, each bank of light fixtures (called a load) is connected to an individual dimmer installed in your wall. For example, you might have a chandelier, two strings of recessed lights, pendants, a ceiling fan, a lamp, etc. Each load is controlled by its own dimmer that’s installed in the wall, and it doesn’t take long to see how the wall clutter starts to build up.
Traditional Lighting Illustration
As the room’s size increases, this problem only multiplies.
Panelized lighting offers an elegant and unique solution to this problem…
Panelized Lighting Keypad Illustration
Rather than placing all the wiring and dimming hardware in the room, each load is pulled back to a centralized location or “panel” and then controlled by a compact keypad installed in each room.
Vantage WireLink Dimmers in Panel Enclosure
These keypads offer up to 8 buttons to control individual fixtures, or your system can be programmed to control multiple loads with a single button.
EasyTouch Glass Keypad by Vantage Controls
Each button is custom laser engraved with text to explain its function. The possibilities are endless, but the result is magical.
True custom design options
When you’re investing in your dream home and undoubtedly obsessing over every detail with your designer. You shouldn’t have to spoil your design or be limited to switches that are only white, almond, or black.
Vantage ControlsEasy Touch Keypad
Vantage gives you a vast selection of color and material options and can even custom match trims to any Sherwin Williams paint code.
VantageAdorne Keypad
You can even carry these cosmetic choices across your regular power outlets for a refined and consistent look.
Light switches are something we use over and over every day; why not make them beautiful?
Automation & Integration
Lighting control is one of the key components of what makes up a “smart home”. Fortunately, the Vantage solution integrates perfectly with home control systems like Elan. This allows us to control every light in the Vantage system from within our Elan app or touchpanels right alongside the other features in your home like Video, Audio, thermostats etc.
Scenes like “Party Mode” or “Movie Time” let us bring everything together by setting the mood with the perfect lighting, turning on the music, and even starting up a movie.
Effortless Energy Savings
When something is annoying or hard to use, most people just tend to avoid the activity. In a larger home with 50+ light switches or even multiple wings, this often adds up to lights just being left on rather than spending 15 minutes making the rounds to ensure everything is properly switched off. With lighting control, we’re able to eliminate that task and make things easier in two ways.
The first is we can provide lighting scenes that simplify things dramatically. A button labeled “all off” is installed at your main points of entry. When you press this button just as you’d expect, everything in the house turns off in one motion.
The second way is the use of schedules and motion sensors. We can schedule groups of lights to turn on and off based on the sunrise or sunset. For example, You probably won’t need your landscape lights during the middle of the day or mood lighting flipped on at high noon, but you might want to come home to a safely illuminated driveway after dark. This can both make your home more inviting and create some substantial savings on your power bill.
Vantage Lighting Installation by Assembledge+ and Billy Rose Design (Los Angeles)
You can also incorporate tiny motion sensors and door switches. Using these sensors allows you to turn lights on and off just by walking in and out of a room or opening a door.
Do you have questions or want to find out more about lighting control systems? Don’t hesitate to reach out, we’d love to talk to you about your project!
F.A.Q.
How much can I expect to spend on lighting control?
Panelized lighting certainly carries a premium over traditional switches and dimmers, but it’s not as expensive as you might think. In general, a cost increase of about $4-$6 per square foot is a good rule of thumb, but that number decreases as the size of the system grows.
What type of finish options are available?
White, Bronze, Black, and Titanium finishes are available as standard, but the sky is really the limit. There are additional premium options like Silver, Gold, Oil-Rubbed Bronze, and Chrome, as well as the custom color matching program.
Does Vantage work as part of a home automation system?
Yes! That’s one of our favorite parts of panelized lighting. When paired with a home automation system like Nice, panelized lighting offers all kinds of possibilities.
Jon King
CEDIA Certified Electronic Systems Designer,
Principal Owner @ Audilux (Nashville, TN).
Former Audio Engineer, Record Producer, & Director with Page 2 Music
When someone mentions a “Home Theater,” what do you think of? We often think of “movie-themed” rooms cut off from the rest of the house that we retreat to when we want a real escape. However, if you’re someone who wants the best picture and sound, but doesn’t particularly want to slip into a void of total isolation (no matter how cool it may be!), don’t despair. There is a solution for you.
Believe it or not, the trend is moving away from dedicated home theater spaces and more towards lifestyle areas that can provide both a great place to hang out and a highly immersive cinematic experience when you’re ready to watch a movie. Of course, it does require some careful planning and coordination with your interior designer, but in 2021 it’s entirely possible to have your cake and eat it too.
Make the best of a beautiful situation.
The reality is that most dedicated home theater spaces can’t be the “perfect room” anyway for one reason or another. In all but the most extreme cases, some spatial or budgetary constraints will get in the way of a textbook layout. Things are no different than with a lifestyle theater. What’s important is knowing the environment you’re working with and designing a solution that overcomes the decorative and acoustic challenges. If you commit to doing things right, high performance is very attainable.
You’ve probably seen pictures online of some unique multi-use spaces; one of our favorites is a combination bar/theater area by Tym Homes. It’s not drab or dark and offers plenty of spots for both conversation and serious stargazing.
Anatomy of a “Lifestyle” home theater
PSA : Due to the need to conceal wiring and hide speakers inside of your walls and ceilings, pulling off these kinds of spaces is much easier when you’re pre-wiring with new construction or when your remodeling a room. It can still be done when you’re not in the midst of a large-scale project, but you’ll probably at the very least end up with some drywall work.
Step 1. Analyze the Space
There are two gremlins to contend with when designing your home theater area. The first is ambient light, and the second is acoustics.
Ambient Light :
Ambient light is the light that is already in the room. You need to pay close attention to where this light is coming from, how much there is of it, and what type of light it is. Not only can it affect the picture quality of your home theater system, but it can also cause eye strain and even headaches. So, what can you do about ambient light? Our go-to solution is installing motorized black-out shades for dealing with sunlight flooding a room through windows and skylights. Shades let you keep your space bright and airy while still effectively controlling the light during viewing.
We also need to make sure we have control of the artificial light in the room. This can be addressed with a basic dimmer switch, but we usually like to take things a step further. For example, implementing lighting control that triggers a “movie scene” lets you create the kind of “magic transformation” most people are looking after.
Now onto the second gremlin;
Acoustics:
Have you ever wondered why movie theater walls are draped in fabric or some other kind of soft cushy materials? We’ve come to associate that with the intrinsic charm of a vintage movie house and probably assume it’s an aesthetic that’s rooted in nostalgic tradition.
In reality, the choice of those materials is very intentional. Hard surfaces like drywall or wood flooring reflect sound, while soft surfaces absorb sound. When sound bounces from surface to surface, this is called a “reflection.” Reflections impact the clarity of the soundtrack, make bass thin and muddy, and generally rain on your parade. Lousy acoustics will make even the most incredible speakers sound anemic.
We tackle these issues with thick fabric walls and huge corner traps in a dedicated theater, but we have to get creative in a lifestyle home theater. Addressing the issue of acoustics is a great touchpoint to coordinate with your interior designer. Ask them to incorporate soft surfaces into your design. If your room has hardwood or stone floors, an area rug under furniture is a significant first step. Furniture soaks up lots of sound, and there is even one more sneaky trick.
If you plan to have any canvases hanging in your room, you can order artwork printed directly on a sound-absorbing panel. No one will be the wiser, but you’ll be effectively taming the reflections in your room.
Lastly, don’t forget to pay attention to the rooms around your lifestyle theater. If bedrooms are nearby, adding a backbox to your in-wall speakers will help keep sound from transferring to adjacent spaces through walls and floors.
Pro Tip: Your neck is calling. If this will be your primary display or TV, don’t put it over your fireplace. Most of the time, a TV mounted high over the fireplace spells severe neck pain, even during casual viewing. However, we do grant an exception for a TV that will double as artwork, like Samsung’s “The Frame.”
I think the true cornerstone of these multi-use spaces is employing a projector system and a retractable motorized screen. There are a couple of ways we can make that happen.
Recessed projector lifts
Recessed Projector Lift with Screen Innovations Zero-G Screen
The biggest advantage of a recessed model is that it takes up the least amount of room possible. The projector is tucked away into the ceiling when not in use and gracefully descends into its working position when called. This really does provide the ultimate “transformer” moment and allows you to completely conceal your room’s dual personality.
Ultra Short Throw Projectors (UST)
Another option for an incognito projector installation is something called an Ultra Short Throw projector. A UST can be placed inches from a wall and even recessed into a custom furniture piece. Due to their close proximity to the screen material, a UST can produce a much brighter than a similarly rated traditional projector. Just keep in mind UST’s require a particular type of screen to make the most of the technology.
You have two choices when it comes to selecting speakers for your lifestyle theater. You can opt for very low-profile speakers that blend away into your design, or you can incorporate options that become a part of your design. (We’ve covered that in greater depth in our post “Top 4 In-wall Speakers Your Designer Will Love!“) Whatever you choose, there are options available that are sure to complement your design.
It’s always best to install your front speakers either directly beside or behind your projector screen. If space or materials don’t allow for that type of setup, When a wall install is not an option, we’re big fans of Focal’s “Invisible Speaker System.”
Focal Invisible Speaker System
These are in-ceiling speakers that fire at an angle to very effectively create the illusion of sound coming from the screen rather than above. They also incorporate backboxes as standard and have a sexy trim-less bezel. Yes, please!
Focal 1000 Series In-Ceiling Speaker
Step 4. Home Theater Seating & Furniture
I think most of us aren’t looking for colossal movie theater recliners in the middle of our living room. That would kind of defeat the whole purpose of a convertible space. Fortunately, several seating companies have stepped up to the plate and now offer home theater seating that’s virtually indistinguishable to even the most discerning taste. Look for “Media Room Furniture”.
If you’ve made it this far, the pieces are all in place, and now it’s time to tie everything together. Here is where an Elan home automation system can take things to the next level. At this point, if you’ve followed our recipe, you have a Projector, Motorized Projection Screen, Receiver, Motorized Shades, and then, of course, the lights and climate in your room to control. My math tells me that it would require no less than six remote controls.
When a customer requests this type of setup, we create a “Movie Mode” button that simplifies this entire ballet into a single button press. From their Elan remote control, touchscreen, or smartphone, the projector lowers into position and powers on, the screen drops down, the room’s lights dim, the sound turns on, and you’re dropped straight to your favorite channel or streaming service. That same Elan remote can control your Apple TV and even adjust the temperature in the room. This is a killer app for home automation—no switching inputs, no modes, and no digging remotes out of the couch.
When movie time is over, press that same “movie time” button, and everything disappears. Finally, the lights fade up, and you’re ready to make memories with your friends.
We love home automation and the way it makes our lives easier. Smart homes are undoubtedly the trend du jour, but once you have a completed system installed, it can be tough to wrap your head around some of the best uses for automation. Automating is an entirely new concept for most people. So I usually tell clients to start by making a list of routines around the house that are repetitive and you find yourself doing over and over.
For example, If you’re always making the rounds turning out the lights on the way out the door, that can be a great chance to put your home control system to work.
While we can’t automate loading the dishes in the dishwasher yet, there are plenty of instances where your smart home can save you time.
Here are five Home Automation Ideas toget you started.
#1 – Welcome Home
Trigger: The garage door opening, your individual presence is detected by your phone or Apple Watch.
What happens: That’s entirely up to you, but our welcome home goes something like this. Dim the main hallway lights to 50% with warm light, start my “Chill” playlist on Spotify, and turn on the local news, (but only with captions) and lastly, drop the temperature on the thermostat 2 degrees.
Why?: Yes, we know having your four-legged friend attack you at the door is the ultimate, but who doesn’t want to get a jump on settling in for the evening? Instead of walking around doing your evening routine, let your home control system take care of everything. Some people have vastly more exotic sequences, so more or less is entirely up to you!
Just pay attention to what you do when you get home, and ask your integrator to “make that happen”.
#2 – The Effortless Exit
Trigger: All occupants leave the house or pressing an “away” button
What happens: All the lights in your home turn off, the security system is armed, and your home goes into “eco mode”
Why?: We mentioned this earlier, but this automation can pretty much save any one time, particularly in a larger home. If you’re a parent, we don’t have to explain any further. This scene can be as simple as having a push-button marked “away” or automatically triggered after an allotted time with no motion detected.
#3 – Popcorn Time
Trigger: A button on your universal remote or touch panel.
What happens: Motorized Shades begin to lower in unison surrounding the living room, the projector and screen lower from the ceiling, the surround sound system goes into movie mode, Netflix pops up on the screen, and the room lights dim to 10%.
Why?: Talk about having a huge impact! With the press of a single button, you’ve effortlessly transformed your living room from an elegant conversational space into a big-screen home cinema. When the movie’s over, press the button again and kick back into social hour.
#4 – Scheduled Scenes
This one doesn’t really fall into the category of a particular “program” but it’s the most universal use case for home control. Set a morning and evening mode for your home.
You can automate the temperature, and trigger certain lighting events based solely on the schedule. This is a great way to make your home evolve and change as the day progresses. Scheduling lighting can even be good for your health.
Perhaps between the hours of midnight and 5AM you only want your lights to turn on at 50% power.
#5 – In case of emergency
Trigger: If a fire alarm is detected
What Happens: all lights fade up to 25%, any audio that’s playing is muted, ceiling fans and ventilation are immediately turned off.
Why?: If a fire is detected in the middle of the night, not fumbling around looking for light switches could save you a lot of time. If the fire is severe, that time could even save your life. We shut off all sounds to make sure everyone can hear the alarm. Turning off the ventilation system in the event of fire helps prevent the flames’ spread and limits the smoke’s ability to travel to other parts of the home. Safety first!
At Audilux we specialize home control & automation by Elan. If you’d like to find out more about the difference between a DIY system and a professionally installed system, start with our blog post “From DIY to Dealer”!
Editors Note: If you're entirely new to home theaters and AV or are trying to gain a basic knowledge of technology in new construction as a homeowner, I would suggest you start your journey with our New Home Technology Guide. It's more of a bird's eye view of what's possible and serves as a great primer on the topic.
Now that you’ve been warned brace yourself for a deep dive into the how. If you’re planning to DIY the wiring of your project, or you want to be very well versed when communicating with your installer you’ve come to the right place. Let’s get started unpacking the process of designing and wiring your smart home from end to end!
The importance of Design:
During the planning stages, anything is possible. As long as you take it into account during this phase, you can integrate a vast number of systems. Of course, it can vary from project to project, but we usually start with the following outline:
Potential sub-systems
Lighting
Audio
Video
HVAC (Heating & Cooling)
Security & Sensors
Cameras & Surveillance
Water & Aquatics
Home Control & Interfaces
Take an inventory of what will and will not apply to your home. For example, if you don’t have a pool or sprinkler system, “Water & Aquatics” can be struck from the list. Next, let’s hash things out a little further. Split each category into detailed subcategories. Here’s an example of the expanded list.
Detailed SubSystem List:
Lighting
Line voltage lighting
Low Voltage lighting
RGBW Lighting Strips
Step Lights
Accent Lights
Outdoor & Landscape Lighting
Floodlights
Path lights
Step Lights
Bollards
Security Lights
Spot Lights
Motorized Window Treatments
Motorized Shades
Motorized Draperies
Audio
Whole-Home Audio (Distributed Audio)
Home Theater
Architectural Speakers
In-Wall Speakers
In-Ceiling Speakers
Free Standing / Furniture Speakers
Soundbars
Subwoofers
Outdoor Audio
In-Ceiling Speakers
On Wall Speakers
Landscape Speakers
Point Source
Bollard
Subwoofers
External Audio Sources
BluRay / DVD
Turntables / Vinyl
Heating & Cooling (HVAC)
Air Conditioner / Heater
ERV or HRV
Dehumidifier or Humidifier
Ceiling Fans
Security System & Sensors
Security wiring panel
Sensors
Motion Sensors
Occupancy Sensors
Glass-Break Sensors
Leak Detection Sensors
Door & Window Sensors
Smoke & Carbon Monoxide Detectors
Water & Aquatics
Pool Control
Spa Control
Irrigation System
Sprinkler System
Drip Irrigation
Water Features
Home Control System
System Controller
Interfaces
Scene Remotes
Touch Panels
Buttons & Keypads
Remote Controls
Access Controls
Smart Door Locks
Garage Door Control
Network & Wifi
Point of Demarkation (Entry to the Home)
Wifi Access Points
Other Data Cabling
You’ll need to create a symbol or marking to delineate each type of device.
Placing your AV Rack and Low-Voltage Panel
You need to consider two critical pieces of equipment when beginning to lay out your wiring plan. The first location is for your equipment rack; the second is for the low-voltage panel or “Smart Panel.”
The rack will hold all of the home’s central nervous system, including patch bays, network switches, audio amplifiers, video distribution equipment, network routers, and your automation system controller. If you decide to centralize your entire home altogether, you might also have cable boxes, satellite receivers, and even more.
The low voltage panel is installed directly into the wall. We find it most useful for housing the coaxial system and all camera-related wiring. Separating the surveillance elements from the rest of the rack enables you to lock the panel up securely. Hence, things keep functioning even if someone attempts tampering with the equipment rack.
Obstacles
When deciding where to place your rack, first and foremost find a location with enough room to accommodate the equipment and plenty of room to work. As much as it might seem like a waste of space, your equipment needs to be located in a conditioned area. Heat is the number one enemy of electronics, so choose a location that’s well ventilated.
You’re also going to have to avoid any major structural members since drilling through them could compromise the integrity of your building. Start your search on an interior wall or under a staircase.