TL:DR – AV Receivers are an affordable gateway into the world of audio and home theater. Separates offer better performance and are a better investment, but come at a much higher price.
Understanding AV Receivers: The All-in-One Solution
Receivers can be looked at as an all-in-one solution for simpler home theater or music setups. This is what you’re used to seeing when you walk into any big box store. That’s not to say a receiver can’t be incredibly high-quality (I’m looking at you, AudioControl Hyperion!), but they’re definitely more prevalent in lower complexity setups.
A receiver includes two major parts. The first part is a processor or pre-amp. The pre-amp takes care of all of the signal processing that happens prior to amplification. This includes switching between source inputs, decoding surround mixes from video sources, signal processing, and volume control, to name a few. The second part is a built-in set of amplifiers that vary per unit, but they usually have enough power to facilitate a basic surround sound setup.
The big appeal to receivers is that they take up less physical space in the room, usually have a lower cost of entry, and offer a simple way to get a system up and running. This integrated approach has a few limitations, though. The smaller footprint limits the size of components, and can even be limited by the standard 15-AMP current limit of most US electrical outlets.[1]
The Truth About Separates: Unlocking Peak Performance
Most budding audiophiles immediately drift to dreams of separate dedicated AV Processors and Amplifiers when visualizing their dream audio setup. [2]
High-Quality Seperates by AudioControl
The real reason for the performance leap has more to do with real estate inside of the case than you might think. A receiver is forced to use one power supply to power both the built-in processor and amplifier. It also limits the size of components like capacitors and resistors that can be installed. Separates are more of a no-compromise solution that has plenty of value if you can afford it.
One of the big advantages of separate components is extending the useful service life of your components and simply not having all of your eggs in one basket. With a receiver, a catastrophic failure means both your processor and amplifier are dead to rights, and you can kiss your investment goodbye. Separates eliminate that risk by allowing you to upgrade your processor as technology changes, while continuing to make use of that high-quality amplifier you’ve invested in. This modularity is a key benefit for long-term system planning.[3]
AV Receivers vs. Separates: A Comparative Look
To help you make an informed decision, let’s break down the key differences between AV receivers and separates:
Feature
AV Receiver
Separates (Processor + Amplifier)
Cost of Entry
Lower
Significantly Higher
Performance Potential
Good for most users, can be limited by integrated design
Higher, due to dedicated components and power supplies
Space Efficiency
High (all-in-one unit)
Lower (multiple components)
Upgradeability
Limited (entire unit must be replaced)
High (individual components can be upgraded)
Power Supply
Shared for processor and amplifier
Dedicated for each component
Component Size Limitations
Yes, due to chassis size and power constraints
No, larger, higher-quality components can be used
Risk of Catastrophic Failure
Higher (failure of one part affects the whole unit)
Lower (failure of one component doesn’t affect others)
Which Path is Right for You?
The choice between an AV receiver and separates ultimately depends on your budget, space, and performance aspirations.
For the budget-conscious and space-limited: An AV receiver offers an excellent balance of features and performance for most home theater enthusiasts. It’s a fantastic starting point to enjoy immersive sound without breaking the bank.
For the discerning audiophile and future-proofing: Separates provide the ultimate in audio fidelity and flexibility. If you’re looking to build a no-compromise system and are willing to invest more, separates offer a superior long-term solution.
Still Unsure About the Best Path for Your Home Theater?
Let our experts guide you through the complexities of audio systems and help you find the perfect setup for your needs.
References
“The Benefits of Modular Audio Systems.” Audio Engineering Society Journal, vol. 65, no. 10, 2017, pp. 801-809.
“Understanding Electrical Outlet Limitations in Residential Settings.” National Electrical Code Handbook, 2020 ed.
Toole, Floyd E. Sound Reproduction: The Acoustics and Psychoacoustics of Loudspeakers and Rooms. Focal Press, 2017.
Jon King
CEDIA Certified Electronic Systems Designer,
Principal Owner @ Audilux (Nashville, TN).
Former Audio Engineer, Record Producer, & Director with Page 2 Music
1. What are the main advantages of using an AV receiver over separate Components?
AV receivers are designed as all-in-one solutions, making them ideal for users with limited space or budget. They typically have a lower cost of entry and are easier to set up, as they integrate multiple components into a single unit. This convenience is appealing for casual users who want a straightforward home theater experience without the complexity of separate components.
Is the Upgrade to Seperates worth it?
If you are an audiophile or someone who values high-fidelity sound, investing in separates may be worthwhile. Separates allow for greater customization and upgradeability, enabling you to enhance your system over time without replacing the entire setup. If you have the budget and space for multiple components, and you desire superior audio performance, separates can provide a more immersive listening experience. Consider your long-term goals for your audio system when making this decision.
Can I use an AV Receiver for a High end audio setup?
Absolutely! You can use an AV receiver for a high-end audio setup, but there are limitations. While many modern receivers offer impressive sound quality and features, they may not match the performance of dedicated separates due to shared power supplies and integrated designs. If you prioritize convenience and cost-effectiveness, a high-quality AV receiver can still deliver excellent audio. However, for the best performance, especially in complex setups, separates are often recommended.
What should I consider when choosing between a Receiver & SeperateS?
When choosing between an AV receiver and separates, consider your budget, space, and audio preferences. Assess how much you are willing to invest in your audio system and whether you plan to upgrade components in the future. Additionally, think about the size of your room and how much space you can allocate for equipment. If you want a simple, compact solution, an AV receiver may be best. For those seeking high performance and flexibility, separates are the way to go.
Are there any downsides to using seperates?
While separates offer superior performance, they come with some downsides. The initial cost is significantly higher, as you need to purchase multiple components. Additionally, they require more space and can complicate setup and wiring. Really though, the only major downside is cost.
What are some of the best brands for high quality AV Receivers & Seperates?
NAD, AudioControl, and Marantz to name a few. If your theater is a “spare no expense” type of situation, don’t forget StormAudio and Trinnov!
Especially in the home theater enthusiast community, we can all be guilty of hyperfocus. Analysis paralysis is a rite of passage for any aficionado; we spend countless hours reading shootouts, reviews, comparisons, and poring over spec sheets until the wee hours of the morning. It’s part of what makes home theater fun.
On the other side of the lens, this phenomenon manifests itself as something reffered to as “Pixel Peeping”. Personified by internet warriors zooming images in to 400% magnification to look at camera defects, even though these outspoken individuals might be devoid of artistic talent, or be incapable of creating any meaningful work product. (Picture someone lauding a 500lb camera lens, even though it’s so large, you can’t practically transport it anywhere to film anything.)
The reason for my diatribe is simple: Specs and math don’t always tell the whole story. While I’m a firm believer in imaging and acoustic science, a laboratory environment is incredibly different from the real world, and the way we experience home cinemas practically is very different from the story told from a spec sheet. It’s important sometimes to remind ourselves that an experience is more than the sum of parts, or a bill of materials.
Understanding Dynamic Range in Projectors
Dynamic range, in the context of projectors, is the range of brightness levels a projector can display, from the darkest point of the image to the brightest highlights.
Excellent black levels are considered a hallmark of superior picture quality. Simply put, how black is the black? True blacks are the big difference between OLED TVs and all their inferior challengers. Since OLED is an emissive display technology, if a pixel has no luminance information, it actually appears jet black, not some crumby shade of gray.
At the most basic level, there are really only two ways to increase overall dynamic range: You can lower your black level, or you can raise the brightness of your whites.
Anyone who’s been following projector technology for the last decade will be quick to laud for their incredible blacks. (They would not be wrong to do so!) If you’re in a perfectly dark room, JVC’s LCOS technology has really bludgeoned all of the competition when it comes to lowering black levels.
On the other side of the equation, maximum brightness in projectors is measured in lumens. Lumens are one of the only figures we have for reliably comparing the maximum light output we can expect in an image. While brightness levels have slowly increased over the years, they’ve remained relatively stable at around 2000-3000 lumens for the better part of a decade.
All of the effort has gone into improving just one side of the equation.
To recap:
Black levels define how dark the darkest parts of an image are.
White levels determine how bright the brightest highlights are.
The distance and graduations between these two points are the dynamic range.
A greater dynamic range leads to better image quality, with more shades of light to dark and more depth to every color.
The Reality of Home Cinema Lighting
Back to my original point: While a pitch-black room is a great benchmark, most of us prefer to enjoy a bucket of popcorn or make use of some of the cool LED accent lights we’re all such fans of. Pitch black isn’t really entirely livable.
Not without stubbed toes, spilled popcorn, and perhaps, angry spouses.
We all have to admit that real life does call for at least a little ambient light.
While lowering black levels is a great way to improve picture quality, those popcorn lights and vibey LEDs add ambient light to your projector screen. Since black can only be as dark as the darkest part of the screen, your epic black levels suddenly drop from incredible to mundane. Even with a fantastic projector, the image washes out, leaving you with a very underwhelming experience.
At this point, you’re really left with two options:
Option A: Kick all the normal people out of the room and embrace the fact that you’re going to be enjoying a lonely existence in your home theater. You do get to watch your movies in utter darkness, but you might turn into a hermit, and you’ll probably end up getting made fun of by your partner
Option B: Enhance your dynamic range with extra brightness and share the experience with everyone you love.
Suppose option B sounds like the correct course of action. There’s really only one solution: Address the brightness side of the equation. Accept the fact that blacks can only be so black with a livable amount of light in the room, and take the light output up to the next level.
Epson’s Approach: The Brightness Advantage
While most manufacturers keep chasing blacker blacks, Epson has taken a slightly different approach. Instead of focusing all their resources on lowering black levels (though their black levels really are quite respectable), they’ve gone full steam ahead down the road less traveled, creating projectors that are absolute light cannons. We aren’t just talking a little bit brighter either.
While top-of-the-line models from Sony and JVC cap out at around 3300 lumens, Epson’s entry-level offering, the QB-1000, starts at 3300 lumens, and their top-of-the-line QL-7000 is capable of a retina-mesmerizing 10,000!
When we made our annual pilgrimage to CEDIA Expo this year (2025), Epson really drove this point home. They offered a demo experience with two equally sized screens placed side by side. They had their major competitors on one side (Sony, JVC), and the price equivalent Epson projector models on the other. The difference was simply staggering.
The other side effect of having so much light output at your disposal is screen size. Epson is really pushing the envelope, enabling screen sizes as big as 300″.
Of course, there are other options at higher price points. Barco and Christie come to the table with some incredible image quality and no compromises, albeit at a much higher cost of entry.
To head off the hate mail, I realize they aren’t going to win the war of spec sheets. I’m the first to admit that if you’re going for a 130″ screen in a completely dark room, JVC is a better option, but I don’t think that’s how most people really want to use their rooms. In real life, Epson’s higher light output usually provides a better experience.
What factors should I consider when choosing a projector for my home theater?
When selecting a projector, consider factors such as brightness (measured in lumens), resolution, contrast ratio, and the type of technology used (LCD, DLP, or LCoS). Additionally, think about the size of your room, the distance from the screen, and the ambient light conditions. A projector with higher lumens is ideal for rooms with more light, while resolution impacts image clarity.
What is the difference between contrast ratio and dynamic range in projectors?
Contrast ratio refers to the difference in brightness between the darkest black and the brightest white a projector can produce. Dynamic range, on the other hand, encompasses the entire spectrum of brightness levels a projector can display, from the darkest to the brightest points. While a high contrast ratio is essential for deep blacks and vibrant colors, a broader dynamic range allows for more subtle gradations in brightness, enhancing overall image quality and depth in the viewing experience.
Are there specific projector brands known for superior brightness?
Yes, certain brands are recognized for their exceptional brightness capabilities. Epson, for instance, is known for producing projectors with high lumen outputs, making them suitable for environments with ambient light. Their models, such as the QB-1000 and QL-7000, offer brightness levels that exceed many competitors. Other brands like Sony and JVC also provide quality projectors, but they typically focus more on achieving deeper blacks rather than maximizing brightness, which can be a crucial factor depending on your viewing conditions.
Jon King
CEDIA Certified Electronic Systems Designer,
Principal Owner @ Audilux (Nashville, TN).
Former Audio Engineer, Record Producer, & Director with Page 2 Music
As you can probably guess, you never know where you will be asked to build a custom home theater. Having a completely blank slate is almost unheard of, and this particular project began its life as a bonus room over a new home’s garage space.
Like most structures not built from the ground up as dedicated screening rooms, this build had its fair share of design challenges. Chief among them was the litany of angled walls, the vaulted ceiling, and the need for a doorway to access a hidden attic library space in the middle of the room.
Every theater room is different, yet with thoughtful engineering even challenging shapes can sound extraordinary.
We broke up the room’s long walls with columns. These columns did two things:
Added visual interest
Helped with acoustic panel placement and bass trapping
One major challenge was keeping access to the attic library without breaking the theater’s aesthetic or sound isolation. We tackled this with careful planning and concealed entry design.
We ultimately settled on concealing a door inside one of the room’s decorative columns.
Custom Build Hidden Door
This was accomplished using a custom door, with acoustic treatments applied directly to its face.
Hidden Door When ClosedHidden Door with Library Space Beyond
Space was also at a premium, and we also needed to find a way to minimize the equipment’s footprint and visual impact inside the room.
We were able to commandeer some unclaimed attic space and installed a recessed rack to house all the equipment. This kept things accessible while also not encroaching on the livable space in the room.
Retractable Middle Atlantic Equipment Rack
Audio
For the main stage, we chose identical in-wall Focal 300-series speakers across all seven channels, paired with timber-matched 8″ overhead speakers for Atmos effects..
Focal 300 Series IWLCR Speakers
A duo of Focal subwoofers rounded out the low end.
Focal Sub 1000F Subwoofer
Nice HR40 Remote
Nice HR40 Remote Control
This also marked our first deployment of the new Nice HR40 remote control. It offers seamless control of all of the sources in the system and even shows cover art from the Kaleidescape during playback.
Kaleidescape, The Finest SOurce
Kaleidescape Strato Interface
It’s been a long-standing secret that if you want the best picture quality, there’s only one place to get your movies.
Long hailed by Hollywood moguls and used in their own personal theaters, the Kaleidescape Strato player serves up movies at a higher quality than HD Blu-Ray with unadulterated audio to match.
Construction Gallery
Original space—raw drywall and exposed attic accessCustom acoustic framing and bass-trap columns take shapeHidden door installed and treated for perfect sealFinal fabric-wall stretch and lighting installation completed
Full Equipment List
System Configuration 7.4.2
Visual
Projector: JVC NZ-7 8K Projector
Screen: 150″ Screen Innovations Zero Edge Pro, Acoustically Transparent
Video Processing: MadVR Envy MKII Extreme
Sound
Audio Processor: AudioControl Maestro X7s
Amplification : AudioControl Savoy G4 , Audio Control Pantages G4
CEDIA Certified Electronic Systems Designer,
Principal Owner @ Audilux (Nashville, TN).
Former Audio Engineer, Record Producer, & Director with Page 2 Music
If you’ve noticed some changes in the weather in the South recently, you’re not alone. The number of severe storms and tornados striking Nashville and the rest of Middle TN has dramatically increased, resulting in a surge in storm shelter construction. While practically speaking, a storm shelter is a great thing to have; these spaces are often only used for a few hours a year.
The story of this build begins when our client approached us with the desire to reclaim his shelter space as a proper home theater while taking full advantage of the acoustic isolation provided by the 12″ thick poured concrete walls.
A very blank concrete canvas
Home Theater in a (Concrete) box
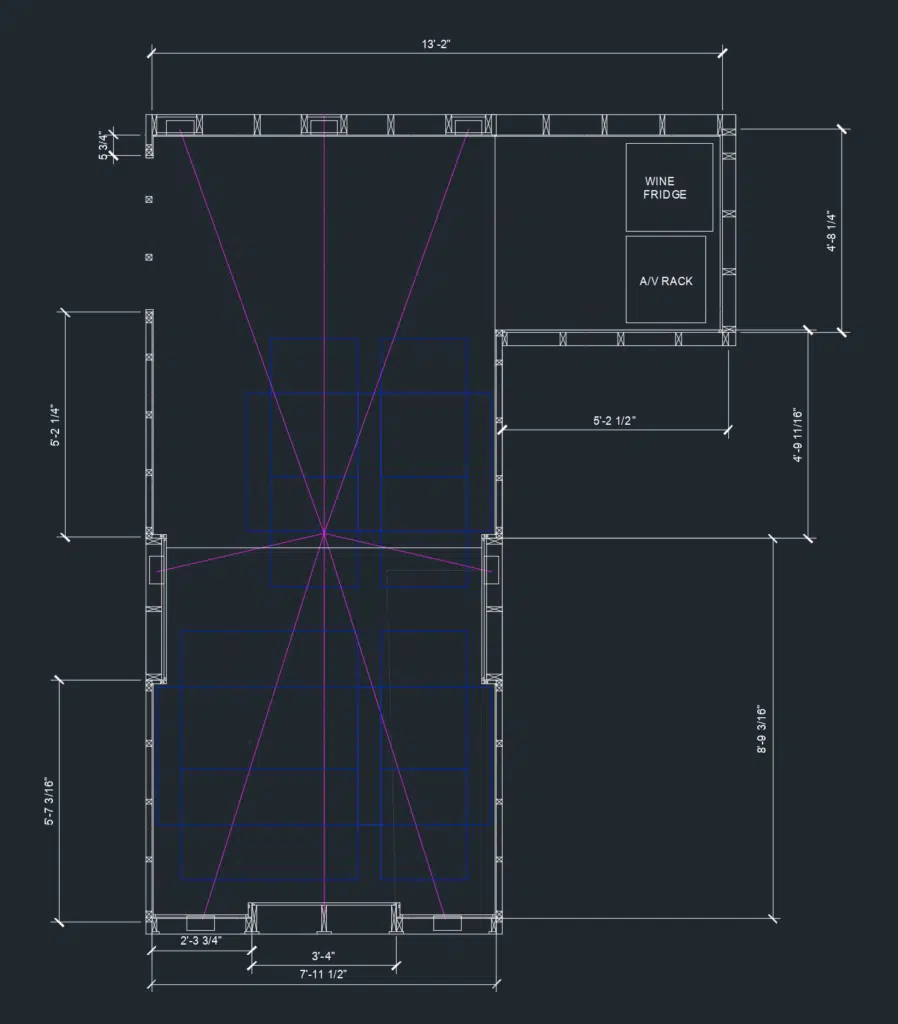
With a pre-build width of only 96″, space was at an absolute premium. A design requirement of having at least five fixed seats led us to create staggered wall depths in each section of the theater to help squeeze both the seating and speakers in.
CAD Layout of The Shelter Theater
This layout opened the door to employing varying types of acoustic treatments and bass trapping while at the same time creating some visual interest through the use of diffused LED accent lighting.
LED Lighting & Trim Details
The crown jewel of the build is a 104″ acoustically transparent projection screen by Screen Innovations. It’s paired with a light blasting HDR projector from LG that makes high-impact viewing possible, even with the lights on.
Screen Innovations Zero-Edge Pro Projection ScreenCustom Home Theater by Audilux
The room’s soundtrack is voiced by a full accouterment of seven 300 Series in-wall speakers from Focal. All of which are stealthily concealed behind the screen or in the walls around the room.
Illustration showing Left, Center, & Right speakers behind the screenThe Shelter Under ConstructionHidden Speakers & Acoustic Treatments
We wanted to find a way to provide illumination that would be fun but at the same time not distract too much from the theater’s prime directive. Several scenes were created including one inspired by “Stranger Things” (my personal favorite).
A “Stranger Things” inspired lighting themeProluxe LED Lighting & Extrusions
Our client chose a fully motorized option for home theater seating by Octane. Trimmed in top-grain leather and equipped with USB power outlets, underlighting, and plenty of storage, these home theater chairs make it easy to settle into a movie or binge your favorite show.
Lights can be controlled by the keypad on the wall or even turned on and off individually with the Elan remote control.
CEDIA Certified Electronic Systems Designer,
Principal Owner @ Audilux (Nashville, TN).
Former Audio Engineer, Record Producer, & Director with Page 2 Music
The process of working with a home technology integrator or AV company on your new home can seem daunting. So much so that even many builders avoid getting involved in the process altogether. While they have an entire army of subcontractors for pretty much anything else, when it comes to technology, you’re lucky to get a shortlist of contractor recommendations. Usually, you are sent off on a harrowing pilgrimage of discovery with nothing more than a prayer that you’ll find a trustworthy soul to enlighten you along the way.
Education is an essential part of our job. If you’ve never had the opportunity to build a custom home before, chances are you might not be aware of the technology that exists, and we try to at least inform you of all of the possibilities. While some things may not ultimately be in your budget, the worst thing that could happen is to find ourselves in a situation where we didn’t mention a product or solution, only for you to hear about it later when it’s too late to include it.
A few of the many hats of your home technology team
As integrators, we wear a lot of hats and can be involved in nearly every facet of the design of your home. If it’s not plumbing or basic electrical, there’s a chance you’ve entered a corner of our Pandora’s box. Whether it’s things that immediately come to mind like AV, home theater, and Wi-Fi, or more leading-edge systems like motorized shades, lighting control, and home automation, the possibilities are dizzyingly endless. Unfortunately, over time, we found there was so much scope to cover that most people didn’t completely understand what they were getting, let alone exactly where anything was going.
Back To The Drawing Board
When we first started the process of rethinking the template for our proposals, I was surprised to see there were no off-the-shelf options for making presentations to clients easy and understandable. So, with a background in graphic design, I decided to invest the time (which admittedly was an easier decision to make during the early days of the pandemic) and create an entirely custom set of icons and graphics that more effectively convey the design of our projects.
The main goal of this investment was to make sure people could easily see what was going where. This approach goes a long way towards ensuring clients understand what to expect when their home is complete and hopefully helps avoid some of those “I didn’t realize this is what you were talking about” moments.
While you don’t have to worry about how any of the magic works, I think it’s critical to provide a clear visual picture of where things are placed throughout the home. We got lots of feedback along the way from clients and family and have further streamlined the process as we’ve gone along. For example, each system is color-coded on the pricing proposal, matching our plans’ icon coloring. So if you see a blue security camera listed on the proposal, it makes it easy to look across and locate exactly where that piece is.
A Fresh Take On Technology Plans
Our new proposals feature easy-to-read icons
At this point, we’ve ended up with an entirely new process for presenting proposals that I feel provides plenty of easy-to-consume information. At the same time, it doesn’t require an electrical engineering degree or honorary Geek Squad nametag. When clients understand what they’re looking at, they can provide meaningful feedback and ask questions that help make us more effective members of your team. It’s been a worthwhile step and helps move us closer to our goal of delivering an experience that’s true “Magic by Design“.
CEDIA Certified Electronic Systems Designer,
Principal Owner @ Audilux (Nashville, TN).
Former Audio Engineer, Record Producer, & Director with Page 2 Music